

How can we Help?

Contractor and Employee Manager (CEM)
For Subscription holders
Company
The 'Company' tab in the left hand menu is available to users who have been granted a password and access to the desktop website.
See the Permissions Guide for information on different access levels and functions. If you do not see a menu item on your profile, you may not have access to it. Please contact your supervisor to arrange access if required.
Sites
Sites is where all information is stored relating to site from updating site address, set site administration and questionaries'. The following section is broken down into the edit and more features of this page.
Edit button
Selecting Edit allows you to view information relating to sites linked to your company profile.

Print QR Code
When “Print QR Code” is selected the system will automatically download your sites QR sign in code. Employees, contractors, and visitors can then scan this printed QR Code. These QR codes are fixed and will not change. If you require a new QR code to be produced, contact the GPlus Live team.
Sign-in Page
If you prefer to offer an electronic sign-in process for employees, contractors and visitors accessing the site using a tablet this system allows for this. Select the “More” button and navigate down to the Sign-In page. A new website tab will open that displays an option for visitors to sign in. A QR Code will appear to encourage visitors to use their own device. Employees and contractors can also use the tablet to enter their unique pin by entering details in the boxes provided to either sign-in or sign-out.
If you have visitors accessing the site regularly, it is recommended that they sign-in on their own device. Once a visitor has completed the sign-in process once on there personal device it will remember them for future sign-in. For security reason this is not the case on a shared device. If a visitor cannot or would prefer not to use their own device, they can click on the sign in and press Tap here is you are unable to scan the QR Code, from here they can enter their details into the tablet.

If questionnaires are being used visitors, contractors and employees will be required to complete.
If inductions are required to be completed by a contractor or an employee using the share device, a QR code will appear to encourage users to scan and complete on their own device. If a users does need to use a shared device, open a new internet tab, type in www.gpluslive.com.ay/my and follow the prompt to sign-in to there personal dashboard to complete their inductions.


More button
By selecting more button this will provide you the option to:
-
Print the QR code sign-in sign out code
-
Electronic Sign in Page
-
Short cut to the Sign-in register
-
Short cut to the Failed Sign-ins register
-
Questionnaire
Sign-in Register
This can be used as a short cut to redirect you to the Sign-in register.
Failed Sign-ins
This can be used as a short cut to redirect you to the Failed Sign-in register.
Questionnaire
The GPlus Live Contractor and Employee Management Module gives you the flexability to add sign-in and sign-out questionnaires, link to any relevant website information. To utilise this feature, navigate to the company, sites page. Select more and scroll to the bottom item on the list.
A new page will open where questions can be entered. Sign-in and Sign-Out statements can be entered and formatted accordingly.
You have a variety of question style to utilise as well as the ability to format the Sign-In and Sign-Out statements.
See below on how to use these features.


Tick and select answer you would like to receive notification on.

Employees and their Profiles
Under Company - Employees you will see a register of all the employee users for the site. Also visually displayed are their Induction and Competencies status, if it is highlighted red, it has not been completed.

Add Employee
In the right hand top corner there is a button to add a new employee.
As the administrator, enter Name, position, email, mobile number and work location. The user is able to enter the remaining personal details through their dashboard.
On pressing Save, the new employee will receive a text and email with a request to add them to the site and their pin.
Click here for what to do if the employee does not receive correspondence.

View and Edit Employee Profile
Once an employee is added and they have agreed to be added to the site you will see their name on the list. Click on 'Details' next to thier name. From here you can view their profile and add job roles, manage required documents, inductions, SWMS, training and Competencies. You can also view next of Kin details.
Job Roles
Job roles are set up by the sites administration (see Set Up Job Roles for more information).
Job roles is the role that the employee has been employed to do and on assigning it to the employee will automatically assign the set up required documents, inductions, SWMS, training and competencies required for the job role. These items will appear red in the employees profile until they are actioned and approved.
Documents
Under the documents tab, a lit of required documents are displayed.
Documents can be downloaded and viewed by clicking the Download button.

Document which appear red have either not be supplies, are not approved or have expired. Permitted users (ie supervisors and administrators) are able to:
Send a link as a reminder to the employee to update their documents by email or SMS by clicking on 'Send link" dropdown and selection the method they wish to send the link by. This date will be recorded in the column (Last Email or Last SMS) for reference.
Documents can also be uploaded from this view, however, this must only be done with the approval from the employee and it is prefered for the employee to upload their documents through their mobile dashboard.
Remove the requirement for the document manually by clicking remove. You can also mark a document as optional. They may not be able to supply currently (i.e. under age employee so no licence available, but can provide later). This option allows the document to not be forgotten to supply at a later date.
This action and the user will be recorded for tracking purposes.
Should you wish to upload a document which is not automatically required through the Job Role, select Add Document in the right had corner.


Inductions
Inductions are set up by the sites administration (see Setting Up Inductions for more information)

Similar to Documents, required inductions will be listed and incomplete inductions will be highlighted red. Permitted users can again Send Link to the employee to prompt them to complete.
An induction can be Overridden by permitted users if it has already have been completed through another method. Click the Override Button. You may also chose to Remove the induction if you feel it is unnecessary for this employee. Both of these actions will again be recorded for tracking purposes.
Clicking on Results will take you to the Completed Induction Register. From here you can view Dates and the Results of the induction by clicking Results.
Job Roles
Job roles are set up to assist in ensuring workers are requested the correct items on commencing work with the company. It is a group of items including individual documents, company documents, inductions, SMWS, policies and procedures for a job role.
Setting up or Adding a Job Role
Job roles are set up on a company level so will remain the same across all company sites.
Step 1 : Navigate to Job roles under the Company menu item
Step 2:
Press Add Job Role and enter the details for the new job role. The description is important as it guides other users to use the correct Job Role when setting up users.
Select the tick box "Exclude from Monthly Summary" if workers with the job role will not need hours included in reporting to the Qld Mining and Quarrying Resources Safety and Health Department (e.g. Truck Drivers)
Save.
Step 3 :
Select Details next to the new Job Role. You will also be made aware by the yellow note which job roles require further set up.
Step 4 :
Add required inductions by selecting the green "Add Induction(s) " button
Check the items to be added to the Job and press "Add"
Step 5 :
Navigate using the tabs across the top to add Company Documents, Employee Documents, SWMS, Procedures and Policies repeating the process in Step 4.
Step 6:
Assign to Employees or Contractors. You can also view all Employees or Contractors who already have this job role assigned.
NOTE: The job role can also be assigned to users when they are being set up or through their Profile.


Editing / Adding requirements to Job Roles
Selecting Edit will allow you to change the Name and Description of the Job Role.
Selecting Details will allow you to change the Required items within the Job Role. You can also select the yellow hyperlink to go directly to Inductions or SWMS
Selecting 'Archive' to remove a Job Role from your System. This will remove the items as required from all Workers with this job role. It will not remove the actual uploaded documents or completed items.
You can view and unarchive Job Roles by selecting the Archived Job Roles Button.
Important Notes About Job Roles
If you have Contractors set up as Administrators they will be required to apply a Job Role to their Employees if adding them directly to the system. This makes it very important to provide a suitable description for the Job Role to ensure they select the correct Role and all requirements are kept up to date and correct.
Users will receive a notification email including their requirements as soon a Job Role is applied or items are added to a Job Role.
Inductions
Inductions are made up of a package of Induction Modules. Inductions Modules are set up within the CEM module and include a section of indicational material which can included:
-
External link to website
-
Embedded code
-
Rich text
-
Attachments (i.e. PDF's)
Inductions management is found under Management, Induction or Induction Modules.

Creating or Editing an Induction Module
Induction modules should be kept short and cover one topic. These will be joined together to create Inductions, so keeping them specific allows for the greatest flexibility in creating your inductions.
To create a new Induction Module or view and edit an existing module, click on Management and Induction Modules.
Here you will see a display of current Induction modules.
To add a new induction module select 'Add Induction Module' green button. In the pop up, provide a name for the module.
Enter your required repeat frequency i.e. how often the induction expires and we it needs to be repeated by the assigned users.
Provide the number of assessment questions the user will need to get correct in order to pass the induction. i.e. if you need 100% of 10 questions put 10. If you require 50% put 5.
Provide a brief description of the induction module. This will be used to provide information to the user on the induction module they are about to complete so it should be concise and clear.
Once you press save the module will be displayed in the Induction Module register.


To add or edit material to the module, click on details in the right hand column or the yellow hyperlink. The yellow hyperlink is a guide to show you if the induction module is missing information to make it a complete package. If this is not showing, material has already bee added or linked.

Under the Induction Material tab there is the option to 'Add Induction Material' by clicking on the green button.
In the pop up window, provide a name to this induction material for part of the module.
The Type drop down list allows you to select which type of material you would like to include:
-
An external link - provide a web address where the material is hosted
-
Embedded code - provide the HTML code to display the material directly into the system
-
Rich text - text directly entered to the system
-
Attachments - such as PDFs or similar documents.
The min duration (sec) allows you to specify a time the user must wait until they are able to move onto the assessment questions. This is to discourage clicking through and not reviewing the content.


When you click Save you can view all material added to the module. You are able to add multiple items to the module eg. a plan and some text.

You can change the order of the induction material by selecting the chocolate bar icon on the far right, when the hand appears move the box to the right position.
Next you will need to add the assessment questions. Click on the assessment tab and 'Add Question' green button. There are options for which type of question to be asked:
-
Yes / No - yes or no answer
-
Radio buttons - one option
-
Multiple choice - must select all correct options
-
Drop down - select correct answer from drop down


You can change the order of the induction material by selecting the chocolate bar icon on the far right, when the hand appears move the box to the right position.
Your induction module is now set up. It will now need to be added to an Induction to be assigned to users.
Creating or Editing a Induction
An induction is a package of your Induction Modules, created to suit different Job Role within the GPlus Live.
Click on Management, Inductions. Here you will see a register of Inductions already available as well as creating new Inductions.

By selecting Details you can view and edit the modules included with the induction as well the sites or assigned users.
Remember if you want to edit the content material you will need to do this through Induction Modules.
From the details view you can move through the menu tabs to make necessary changes.
Click on the Add Module button to add further modules to the induction package. You will be provided with a list of available Induction modules to select from. You can also unlink and modules no longer relevant or required.


If your company has multiply sites linked to your company profile, you can define what sites this induction will apply to. The induction can be linked to multiply sites.
It is recommended inductions have a Job Role added. Whenever a new contractor or employee is assigned to that job role the induction package will be added to their requirements. Their names will then automatically be added to the Assigned to (Employee) or Assigned to (Contractors) lists.
It is, however, still possible to assign inductions to individual users through the 'Assigned to' lists (Employees and Contractors).
Changes to induction module material will not trigger users to redo the induction module. When their induction expires they will be required to do the new induction. Should an immediate review and assessment be required it is advised the induction is archived and start a new Induction package.
Adding a New Induction
To add a new induction, select Add Induction green button on the right hand side of the page.
Name the new induction module. Define if it is mandatory for visitors upon sign-in and if it is recommended to be completed by employees and or contractors.
Once added the Induction will be available on the Induction Register. Select Details in the the right hand column or press the yellow Hyperlink says add Modules to this Induction.
As described above in the Edit Induction Section, proceed to add Modules, users roles and / or assigned users.

Inductions
Inductions are made up of a package of Induction Modules. Inductions Modules are set up within the CEM module and include a section of indicational material which can included:
-
External link to website
-
Embedded code
-
Rich text
-
Attachments (i.e. PDF's)
Inductions management is found under Management, Induction or Induction Modules.
Creating or Editing an Induction Module
Induction modules should be kept short and cover one topic. These will be joined together to create Inductions, so keeping them specific allows for the greatest flexibility in creating your inductions.
To create a new Induction Module or view and edit an existing module, click on Management and Induction Modules.
Here you will see a display of current Induction modules.
To add a new induction module select 'Add Induction Module' green button. In the pop up, provide a name for the module.
Enter your required repeat frequency i.e. how often the induction expires and we it needs to be repeated by the assigned users.
Provide the number of assessment questions the user will need to get correct in order to pass the induction. i.e. if you need 100% of 10 questions put 10. If you require 50% put 5.
Provide a brief description of the induction module. This will be used to provide information to the user on the induction module they are about to complete so it should be concise and clear.
Once you press save the module will be displayed in the Induction Module register.
To add or edit material to the module, click on details in the right hand column or the yellow hyperlink. The yellow hyperlink is a guide to show you if the induction module is missing information to make it a complete package. If this is not showing, material has already bee added or linked.
Under the Induction Material tab there is the option to 'Add Induction Material' by clicking on the green button.
In the pop up window, provide a name to this induction material for part of the module.
The Type drop down list allows you to select which type of material you would like to include:
-
An external link - provide a web address where the material is hosted
-
Embedded code - provide the HTML code to display the material directly into the system
-
Rich text - text directly entered to the system
-
Attachments - such as PDFs or similar documents.
The min duration (sec) allows you to specify a time the user must wait until they are able to move onto the assessment questions. This is to discourage clicking through and not reviewing the content.
When you click Save you can view all material added to the module. You are able to add multiple items to the module eg. a plan and some text.
You can change the order of the induction material by selecting the chocolate bar icon on the far right, when the hand appears move the box to the right position.
Next you will need to add the assessment questions. Click on the assessment tab and 'Add Question' green button. There are options for which type of question to be asked:
-
Yes / No - yes or no answer
-
Radio buttons - one option
-
Multiple choice - must select all correct options
-
Drop down - select correct answer from drop down
You can change the order of the induction material by selecting the chocolate bar icon on the far right, when the hand appears move the box to the right position.
Your induction module is now set up. It will now need to be added to an Induction to be assigned to users.
Creating or Editing a Induction
An induction is a package of your Induction Modules, created to suit different Job Role within the GPlus Live.
Click on Management, Inductions. Here you will see a register of Inductions already available as well as creating new Inductions.
By selecting Details you can view and edit the modules included with the induction as well the sites or assigned users.
Remember if you want to edit the content material you will need to do this through Induction Modules.
From the details view you can move through the menu tabs to make necessary changes.
Click on the Add Module button to add further modules to the induction package. You will be provided with a list of available Induction modules to select from. You can also unlink and modules no longer relevant or required.
If your company has multiply sites linked to your company profile, you can define what sites this induction will apply to. The induction can be linked to multiply sites.
It is recommended inductions have a Job Role added. Whenever a new contractor or employee is assigned to that job role the induction package will be added to their requirements. Their names will then automatically be added to the Assigned to (Employee) or Assigned to (Contractors) lists.
It is, however, still possible to assign inductions to individual users through the 'Assigned to' lists (Employees and Contractors).
Changes to induction module material will not trigger users to redo the induction module. When their induction expires they will be required to do the new induction. Should an immediate review and assessment be required it is advised the induction is archived and start a new Induction package.
Adding a New Induction
To add a new induction, select Add Induction green button on the right hand side of the page.
Name the new induction module. Define if it is mandatory for visitors upon sign-in and if it is recommended to be completed by employees and or contractors.
Once added the Induction will be available on the Induction Register. Select Details in the the right hand column or press the yellow Hyperlink says add Modules to this Induction.
As described above in the Edit Induction Section, proceed to add Modules, users roles and / or assigned users.
Training
Training and subsequent competencies can be assessed, tracked and certified in the GPlus Live system.
Training in the system is either internal training under the tuition of a supervisor permitted user, or external training by a third party operation.
Internal training involves the supervisor issuing a notification to the user to undertake a training in the system. The user will then need to do the onsite training with a suitably qualified person, normally their supervisor, quarry manager or SSE. Once onsite training has been completed, the user will need to complete any assessment set up for that training through GPlus Live.
The supervisor will then be notified that the user has completed their assessment and will be required to review the answers to the assessment (these are not automatically marked by the system) and complete their own assessment on the users competency in the training. They may pass or fail the user. If fail, the user will be notified and the process can start again until they are deemed to pass.
Setting up Training
To set up or edit a training in the system, go to 'Management', 'Training'. This page will display a register or training programs in the system. Clicking on Details in the right hand column will allow you to see all details and make changes to the training program.
To add a new training program press 'Add Training' in the right hand corner.
Provide a name for the training.
Select if the training will be:
- Internal : under the tuition and assessment of a supervisor permitted user.
- External : Training and assessment provided by an external third party organisation.
- Internal or external : allows the user to decide how they would like to complete the training.
Valid for: how long the training will be valid for before the user will need to redo the training and assessment. The system will automatically expire the training and request it to be redone.
Description : provide a description of the training. Will be uses in system correspondence so make sure its clear and concise.
Applicable equipment : Allows training to be attached to specific equipment.

On selecting 'Save and Go to Detail', you will be directed to the details page for the training.
Using the tabs, attached the training to a competency (see Competencies set up below).
Add assessment questions for both the employee and the supervisor. These questions do not have a correct answer in the system, they will need to be checked by the Supervisor.
Assign it to Employees (this may happen automatically if added to a Competency). They will receive a notification to complete the training and it will appear as an item on their mobile dashboard.


Completing the Training Process
The employee will need to complete the onsite training and assessment through their mobile dashboard view. They can also upload third part external training if requested.
Once the employee has completed the Supervisor will need to complete their part. All training requiring action should be displayed in the ribbon on the home page. Otherwise it can be accessed through the employee profile.

Select Complete as Supervisor and answer the assessment questions. You are able to leave comments which will be delivered in the notification to the employee.
If you feel the employee is still not completed in the training material, you can select 'Request Additional Training' and leave a comment. This will then require the employee to do the training process again.
Once complete, you are also able to Invalidate the training should you believe the employee is no longer competent or you would like them to repeat the training.
Competencies
Competencies are a group of trainings completed in order to be deemed competent in a aspect of work. This is not necessarily the users Job Roles but may be connected. You can have competencies not related to your job role eg. Operator may have a weighbridge operation competencies. This function is only available to employees not contractors.
Setting up and Managing Competencies
Go to Company - Competencies
On this page you will see a register of current Competencies.
To add a new competency select 'Add Competency'.
You can choose to add a Competency from our Master List, which uses our whole database to make setting up more efficient.
Otherwise you can set up a new Competency. Provide a Name and Description. Press Save and Close or Save and go to detail to complete the set up.


Verification of Competencies (VoCs)
Verification of Competency Certificates (VoC) can be issued when an operator is deem competent to specified groups of trainings and documents. Multiple variations of VoCs can be set up within a competency. For example, an operator can be deems competed as an operator and have a VOC for operation of FEL1 and FEL2. Another operator may have a VOC for FEL1 and FEL3. Both have the Operator competency. We have produced a Flow Chart, download here, to assist in the VOC management process.
To set up VoCs go to Company - Competencies. Press VoC setup next to the Competency which requires it. within the Competency, press Add Certificate.


Provide a name and description for the VOC, be clear and concise as this will be displayed in the VoCs produced by the system.
Select and company documents required, such as insurances.
Select any other person document such as licences, qualification etc
Select any required training through GPlus live, either internal or external. They will need to be logged in the training section of GPlus Live to appear.

Assigning and Completing VoCs
Under Company - Competency select details next to the Competency the VoC is related to. Select Assigned to (Employees) you can add Employees to a VoC.

On pressing Add Employee you will be required to select which VoC and which employee you would like to assign.
Press Add and go to details of the VoC.
From the detail view you are able to see if the employee has the correct training and documents to finish the VoC. The employee will receive an email prompting completing of the required items.
This can be resent at anytime from the page should they require the link again.
Once an employee has completed all the items required for a VoC, the system will show that the Supervisor needs to Sign the VoC and issue it to the employee to complete.
Select Sign and Send to Employee. Sign in the provided box and Save.
The Employee will get notification of the VoC requiring their action and will be able to complete on their mobile dashboard.


Contractor Management
How to add Contractor Companies and Employees to GPlus Live.
You are provided a shortcut button on your home page:

This short cut will take you directly to the Add Contractor Employee window.
The other option is to navigate to the left hand menu, open up the contractor tab, and select Contractor Employee.

Then select the green ''Add Contractor Employee'' button top right hand side, to take you to the new window.
Either option with take you to the page to add in new contractors employees for your site and company.

Our Add Contractor Employee window is broken down into 3 sections.
Section One:
Our first section, is giving you the ability to search for a Company that has previous been set yo with GPlus Live or create a new Company to be set up with GPlus Live.
However as soon as you start typing in the email address, and our system recognises the email address the Existing Company will be populated.
If the company you are trying to enter is not in our list, please provide company name in the field box provided.
Section Two:
Section two is where we enter in the contractor employees email address. As you are typing in the email address the system is cross checking our database to see if this new contractor employee is already in our system and is to now be linked with you.
If the Contractor employees email address is already in the system the following widow will appear:

GPlus Live has recognise that this users is already in the system. So no details need to be enter (i.e. name and mobile number).
Next step, choose what sites this contractor will be able to access and if you are a subscriber to out Plant and Equipment Maintenance module, and they need access, provide then access by tick the box.
GPlus Live has NOT recognise this users so you will need to add in contractor employee details (first and last name and phone number.
Next step, choose what sites this contractor will be able to access and if you are a subscriber to out Plant and Equipment Maintenance module, and they need access, provide then access by tick the box.

Section Three:
Our final section is applying the company job roles set up for all the relevant documentation requests, induction, management requests (SWMS / Procedures / Policies) to be completed by this contractor. Remember you can apply multiple job roles to a worker, you are not limited to one and any duplication across the roles will require the user to only complete/ supply once.
Select the save and send SMS button.
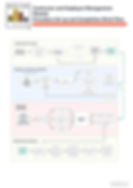
This will trigger a SMS (example image below of text message contractors will receive) to be sent to the contractor advising them (new or existing) that your company and site would like to link or add them to your GPlus Live company profile. The contractor is required to except this link for you to be able to see their profile. Once SMS has been excepted this will issue a pin (or a reminder pin) and then a request to complete inductions, supply information and complete management requests.
This pending contractor request will be visible from the CEM home page and at any time you can cancel the request or re issue the SMS request to the contractor.


Contractor Companies
Your contactor companies page, is your resource of where to access the full list of contractor companies linked to your company, what sites they have access, the administration account holder/s for that company to as well seeing viewing their supplied contractor information. You can also export this data to excel.

Documents:
Selecting the grey documents button will bring you up the list of supplied documentation, such as insurances. Any items in red has been requested and is still to be supplied.
Use the search boxes to find a specific documents, select download to view supplied document.
Expiry date reminders are issued out to contractors 30 days before and day of expiry.


Edit:
By selecting the edit button you can now remove or add site access for the selected contractor company. (applicable to companies with more than one site).
Archive:
No longer want a contractor company linked with you company, select the archive button to remove them completely from the company. Use the edit button if its for a site only.
Select the orange yellow button to see previously linked contracting companies.
Add Contractor:
Selecting the Add Contractor button will allow you to add in a contractor company that has previous been set up in GPlus Live and give you the option to add in sites. Please note this will not give you access to their employees you will still need to add them, see section above for details on how.
Contractor Employee
The Contractor Employee page gives you the ability to review their details, edit and assign management documentation, remove access and export data.
This view is details about all the contractors employees liked to that company that you have been provided access to view.
Switch companies using the list in the top right hand corner. Short cut the Contractor Matrix is also provided.

Details:
Will direct you to the employees profile page
Edit:
Selecting edit, will bring up a quick access page, to provide you the ability to add site/s and job roles to the contractor, provide Plant and Equipment Maintenance access (PEM subscribers only).
Also the option to email/SMS pin reminders to the contractor.
Remove Access:
This will remove the contractor employee from your company completely. If you need that contractor relinked to your company you will have to work through the add contractor employee request.

Contractor Profiles:
These profiles work the same way as. However certain information is hidden for privacy reasons. The top section is company and personal details, and if they have accepted the system terms of service and privacy details.
The lower section are you menu items to view and assigned additional information, and in some cases remove.

Contractor Profiles:
Multiply job roles can
Documents
Under the documents tab, a lit of required documents are displayed.
Documents can be downloaded and viewed by clicking the Download button.
Document which appear red have either not be supplies, are not approved or have expired. Permitted users (ie supervisors and administrators) are able to:
Send a link as a reminder to the employee to update their documents by email or SMS by clicking on 'Send link" dropdown and selection the method they wish to send the link by. This date will be recorded in the column (Last Email or Last SMS) for reference.
Documents can also be uploaded from this view, however, this must only be done with the approval from the employee and it is prefered for the employee to upload their documents through their mobile dashboard.
Remove the requirement is only available for the Client not the contracor. .
Contractor Matrix
Refer to Understanding Your Contractor Matrix Guide.
Policies, Procedures and SWMS
The system stores you SWMS, Policies and Procedure registers under Management in the left hand menu.
These can be added to the register using the Add button in the top right hand corner.
Give the document a name, revision number, and provide a description on the document.
This will be displayed to the users when they receive the notification of the document, so
needs to be concise and informative.


_1.jpg)